Quick Answer: Best Process Lasso Settings for Gaming
For the vast majority of gaming PCs, optimal performance comes from enabling core automation features while leaving fine-grained core allocations untouched unless a specific hardware issue requires intervention.
| Setting | Recommended Value | Purpose |
|---|---|---|
| ProBalance | Enabled | Prevents background tasks from choking the CPU during gameplay. |
| Performance Mode | Enabled for Games | Locks the system into a high-performance state whenever your game executes. |
| Power Profile | Bitsum Highest Performance | Disables CPU core parking and eliminates clock frequency throttling latency. |
| CPU Priority | Normal or High (Optional) | Keeps game threads prioritized over normal utility software. |
| CPU Affinity | Only when needed | Assigns specific CPU cores only for hybrid architectures or older buggy game engines. |
| Real-Time Priority | Avoid | Prevents critical operating system freeze-ups and peripheral disconnects. |
Does Process Lasso Actually Improve Gaming Performance?
A common question among PC enthusiasts is whether optimization utilities genuinely enhance game responsiveness or if it simply acts as digital placebo. The real-world impact depends heavily on your system architecture and background workload.
The software does not increase graphics card clock speeds or add raw compute power to your processor. If a game is bottlenecked entirely by an overworked GPU running at maximum utilization, background thread optimization will typically not raise peak framerates.
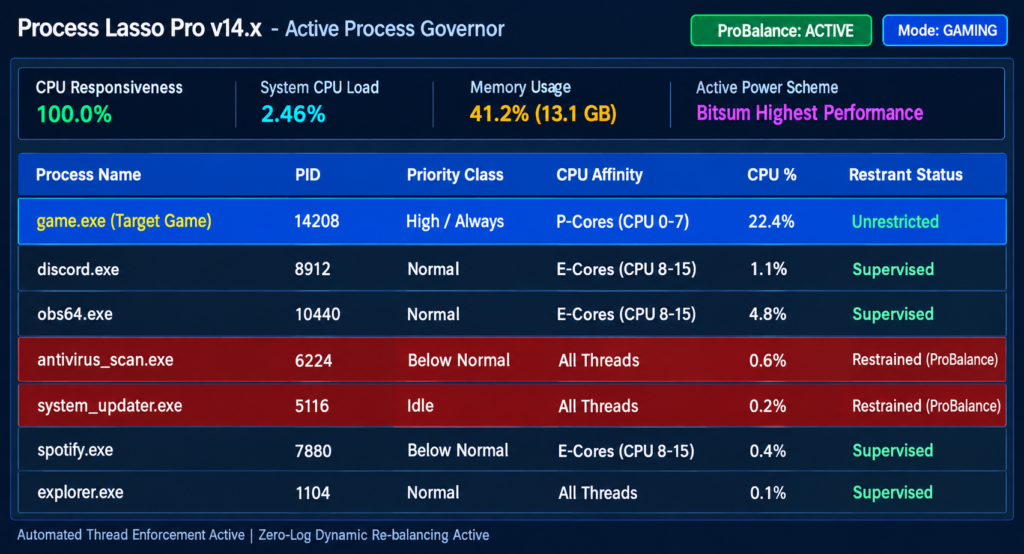
Where the utility genuinely shines is in CPU responsiveness and frame time consistency. In modern gaming, sudden stutters and jarring dips in 1% low frames are rarely caused by the game engine alone. They frequently occur when an unexpected background process, such as an antivirus scan, cloud sync, browser audio thread, or updater service, demands CPU cycles on the exact same thread running the main game loop. By restricting these intrusive processes, Process Lasso helps maintain smooth, uninterrupted frame delivery.
Best Process Lasso Settings for Gaming
Achieving ideal configuration parameters requires adjusting a handful of proven utility settings while resisting the urge to micromanage every background task.
Enable ProBalance to Control Background Processes
ProBalance, short for Process Balance, is the flagship algorithm developed by Bitsum. It monitors system-wide CPU contention in real time. When a secondary application begins consuming an excessive amount of CPU time and threatens system responsiveness, ProBalance temporarily lowers that application’s process priority class.
This intervention is temporary and dynamic. As soon as the offending application reduces its demand or system load clears, Process Lasso restores the process to its default priority state. For gaming, leaving ProBalance enabled ensures that Discord, web browsers, recording tools, and peripheral configuration suites cannot starve your game of critical compute cycles during demanding combat sequences.
Enable Performance Mode for Your Games
Performance Mode is Bitsum’s dedicated framework for ensuring your PC runs at maximum readiness while gaming. Instead of keeping your computer in an aggressive, power-hungry state twenty-four hours a day, Process Lasso can induce Performance Mode dynamically whenever a game executable launches.
To configure this setting, open Process Lasso while your game is running, locate the game executable in the process list, right-click its entry, navigate to Application Power Profile, and select Induce Performance Mode. You can also designate the executable as a game process under the main options menu, which automates high-performance behavior without requiring complicated rules.
Use the Right Power Profile for Gaming
Windows includes standard power plans such as Balanced and High Performance, but both have limitations when it comes to low-latency frame pacing. The Windows Balanced plan frequently attempts to downclock CPU cores or park idle threads to conserve electricity, introducing micro-delays when game engines abruptly request high burst frequencies.
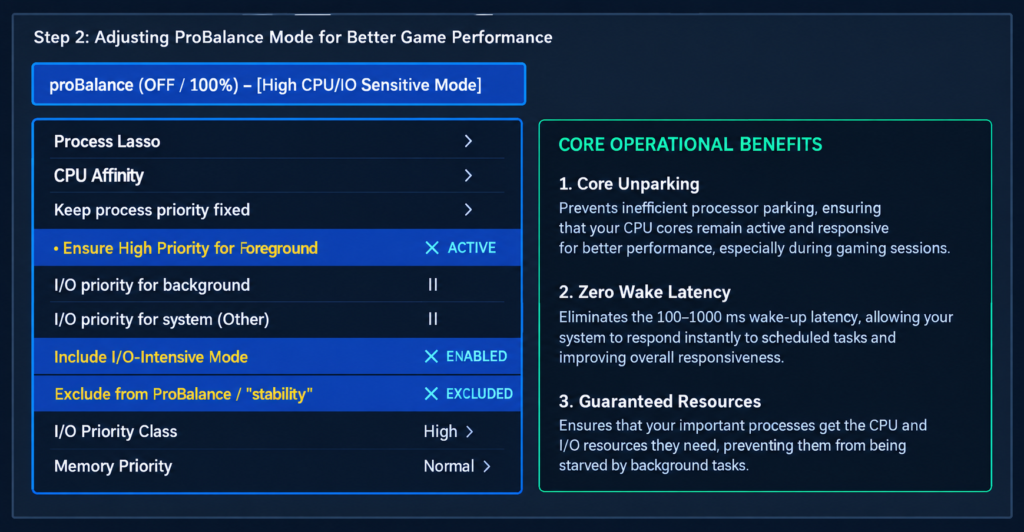
Process Lasso includes a custom profile called Bitsum Highest Performance. This profile aims to minimize core parking and clock down-throttling, helping ensure that execution threads remain active and responsive during demanding workloads. Gamers should configure Process Lasso to switch to Bitsum Highest Performance when games execute, then drop back to Balanced when gaming sessions conclude.
Adjust CPU Priority Carefully
Adjusting CPU priority tells the Windows scheduler which tasks should receive processor attention first. By default, games run at Normal priority, sharing execution queues equally with standard desktop tasks.
For CPU-heavy competitive titles like Counter-Strike 2, Valorant, or Call of Duty, you can right-click the game executable in Process Lasso, choose CPU Priority, select Always, and choose High. This subtle adjustment ensures your game takes precedence over background utilities. Never configure a game to Above Normal or High across every single application on your system, as giving everything priority negates the advantage entirely.
Configure CPU Affinity Only When Needed
CPU affinity settings determine which specific processor cores an application is permitted to run on. Some online gaming guides mistakenly suggest disabling half of your CPU cores or manually pinning games to random threads. Such arbitrary restrictions usually degrade performance by limiting the game engine’s internal multithreading.
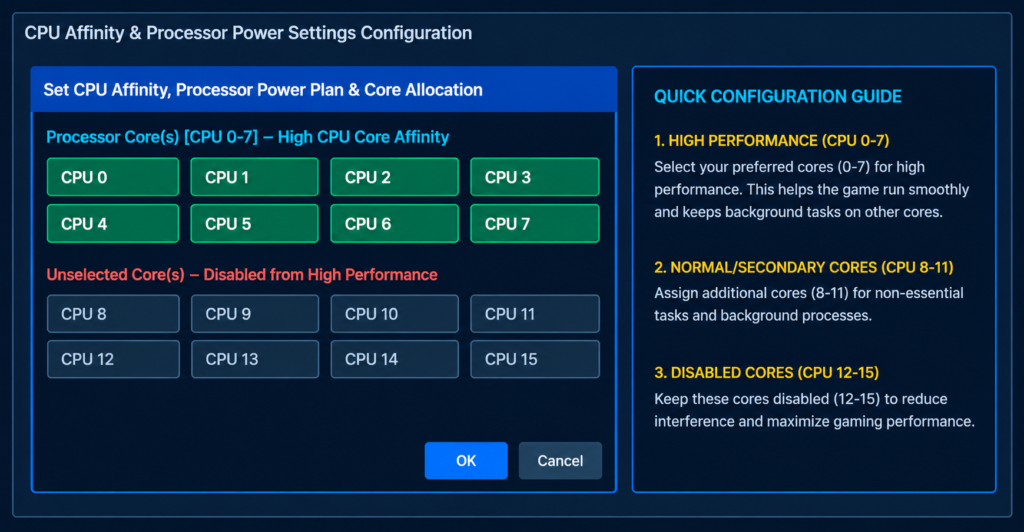
CPU affinity rules should only be applied under specific circumstances. These include keeping older titles that crash on systems with more than eight cores stable, or keeping games away from hyperthreaded logical cores if a title exhibits severe frame pacing jitter. For most modern gaming titles, allowing the game engine to utilize all available high-performance cores yields the highest framerate stability.
How to Optimize Processor for Gaming Using Process Lasso
Maximizing processor efficiency requires an organized approach to identifying bottlenecks, eliminating software bloat, and saving persistent rules.
First, monitor your CPU usage patterns during an active gaming session. Launch Process Lasso on a secondary monitor or examine its historical charts after a play session. Look closely at the responsiveness percentage and watch for red bars indicating ProBalance events. If responsiveness repeatedly dips below 98%, your CPU is experiencing contention from background applications.
Second, systematically isolate unnecessary background load. Utilities such as RGB lighting synchronizers, peripheral managers, and game launchers often run resource-intensive web app frameworks in the background. In Process Lasso, right-click these secondary processes, navigate to CPU Priority, and set their persistent priority to Below Normal or Idle. This ensures they can never disrupt the game thread while still letting them run their intended functions.
Third, establish persistent rules for your library of games. Using the Always sub-menu within Process Lasso ensures that every time your favorite simulator or competitive shooter executes, Process Lasso immediately enforces your chosen priority, power plan, and affinity automatically without requiring manual configuration each session.
Process Lasso Settings for Different Gaming Systems
Different CPU architectures interact with the Windows scheduler in distinctive ways, requiring targeted adjustments.
| Hardware Platform | Primary Challenge | Recommended Process Lasso Strategy |
|---|---|---|
| Intel Hybrid (12th-14th Gen, Core Ultra) | Game threads mistakenly scheduling on slower E-cores. | Set game CPU Affinity to P-cores only; pin background apps (Discord, OBS) to E-cores. |
| AMD Ryzen Dual-CCD (e.g., 7900X, 7950X3D) | Inter-core latency across separate chiplets. | Restrict the game to the single CCD containing 3D V-Cache (typically Cores 0-15). |
| Gaming Laptops | Thermal throttling and aggressive power limits. | Use Bitsum Highest Performance while plugged in, but let ProBalance manage thermal spikes. |
Best Process Lasso Settings for Intel CPUs
Intel processors starting from the 12th Generation Alder Lake through modern architectures utilize a hybrid configuration composed of powerful Performance cores (P-cores) and energy-efficient Efficient cores (E-cores). While the built-in Intel Thread Director does an admirable job, certain games still schedule critical rendering threads onto slower E-cores, creating abrupt frametime spikes.
On these systems, you can right-click your game executable in Process Lasso, open CPU Affinity, click Always, and uncheck all E-cores, allowing the game to run exclusively across the high-clocked P-cores. Simultaneously, you can assign heavy streaming software or voice chats exclusively to the E-cores, effectively isolating the game from secondary system tasks.
Best Process Lasso Settings for AMD Ryzen CPUs
AMD Ryzen processors built on single-die architecture, like the Ryzen 5 7600X or Ryzen 7 7800X3D, do not require complex affinity modifications. For these chips, broad core restrictions generally hurt multicore rendering engines. Keep CPU affinity set to all cores and rely on ProBalance to preserve responsiveness.
For dual-die processors such as the Ryzen 9 7900X3D or 7950X3D, only one compute die features the ultra-fast 3D V-Cache. If your operating system fails to park the standard frequency die during gaming, use Process Lasso to create a persistent affinity rule pinning your game strictly to the V-Cache CCD, eliminating latency penalties caused by cross-chiplet communication.
Best Process Lasso Settings for Gaming Laptops
Gaming laptops operate inside tightly constrained thermal envelopes where both the CPU and GPU share heat pipes and cooling fans. Running an unnecessarily aggressive profile while disconnected from the wall will deplete the battery within minutes and trigger emergency thermal throttling.
Configure Process Lasso to use Bitsum Highest Performance only when AC power is detected. Furthermore, use Process Lasso’s ProBalance aggressively to tamp down background tasks. Keeping secondary programs from waking sleeping CPU states preserves thermal headroom, allowing the laptop’s GPU to boost higher and sustain peak framerates longer without thermal throttling.
Process Lasso vs Default Windows Settings: Is It Better?
The native Windows scheduler has improved substantially in Windows 10 and Windows 11, leading many players to question if third-party software remains relevant.
For everyday desktop usage and standard gaming setups running clean operating systems with no background clutter, default Windows behavior works adequately. The Windows scheduler operates reactively, attempting to distribute workloads dynamically across all threads based on current demand.
Process Lasso operates as an intelligent supervisory layer above standard Windows scheduling. Unlike Windows, which forgets manual task manager priority changes the second a program closes, Process Lasso maintains fully persistent rules. It provides real-time prevention against rogue background execution, automates dynamic power profile toggles, and allows targeted thread binding that the built-in operating system tools simply cannot perform.
What Is Process Lasso’s Game Mode?
Some users search Process Lasso menus looking for a single switch labeled Game Mode, expecting a tool similar to the Windows Game Bar or third-party booster utilities.
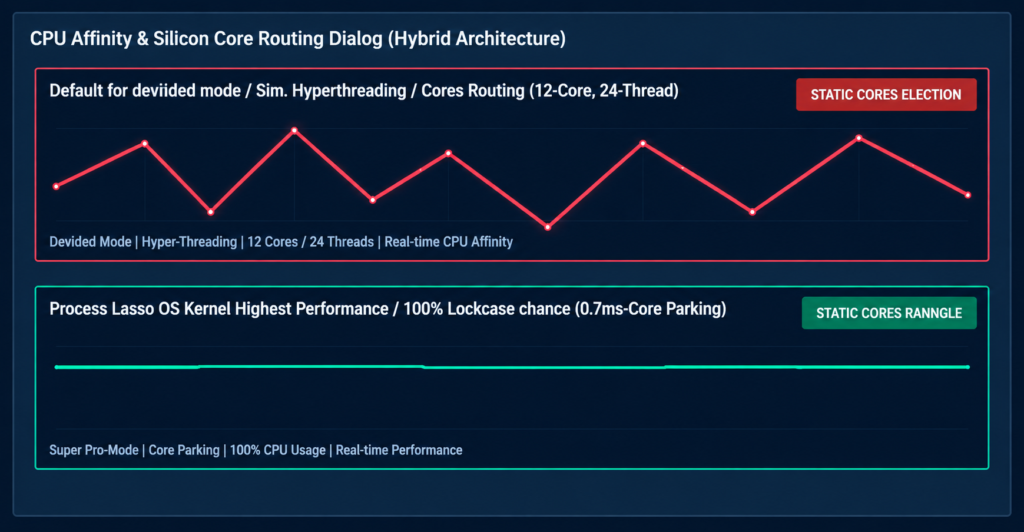
Process Lasso does not rely on a generic, one-size-fits-all Game Mode toggle. Instead, its gaming framework is composed of Performance Mode, targeted persistent priority rules, and automated power schemes. When users talk about Process Lasso Game Mode, they are referring to configuring their system so that launching a game automatically invokes Bitsum Highest Performance, engages ProBalance protection, and elevates the game process above peripheral desktop noise.
Process Lasso Settings You Should Avoid for Gaming
Aggressive misconfiguration can easily cause worse performance, application crashes, and entire system lockups. Avoid these critical configuration pitfalls.
Avoid Setting Every Process to High Priority
Raising the priority class of your game, your mouse software, your recording program, and your communication tools all at once renders the priority system useless. Priority is purely relative. If multiple resource-heavy applications sit at High, they will compete aggressively against one another for CPU execution time, generating the exact stuttering you sought to cure.
Avoid Using Real-Time Priority
Setting any game or background process to Real-Time priority is dangerous. In the Windows operating system hierarchy, Real-Time priority places an application above essential system drivers, including keyboard input, mouse polling, audio buffers, and disk transfer routines. If a game thread spikes to 100% usage while set to Real-Time, your operating system can experience severe unresponsiveness, causing audio crackling, input dropouts, and potential system instability.
Avoid Changing CPU Affinity Without Testing
Disabling logical threads or stripping cores away from modern game titles based on outdated forum posts is a recipe for poor performance. Modern engines rely heavily on multi-threaded asset streaming and asynchronous compute. Unless you are diagnosing an Intel third-gen chipset or an AMD dual-CCD latency issue, always test before and after with dedicated benchmarking software before locking down CPU affinities.
Avoid Disabling Useful Background Services Blindly
Process Lasso also lets users aggressively terminate and restrict system services. Indiscriminately killing background host processes can disrupt anti-cheat engines, break game save synchronization, or corrupt network adapter drivers during multiplayer matches. Restrict application priorities gently rather than terminating unknown dependencies.
How to Test If Process Lasso Improved Gaming Performance
Never rely on subjective feeling alone when evaluating gaming optimizations. Human perception is prone to confirmation bias, particularly after spending time fine-tuning settings.
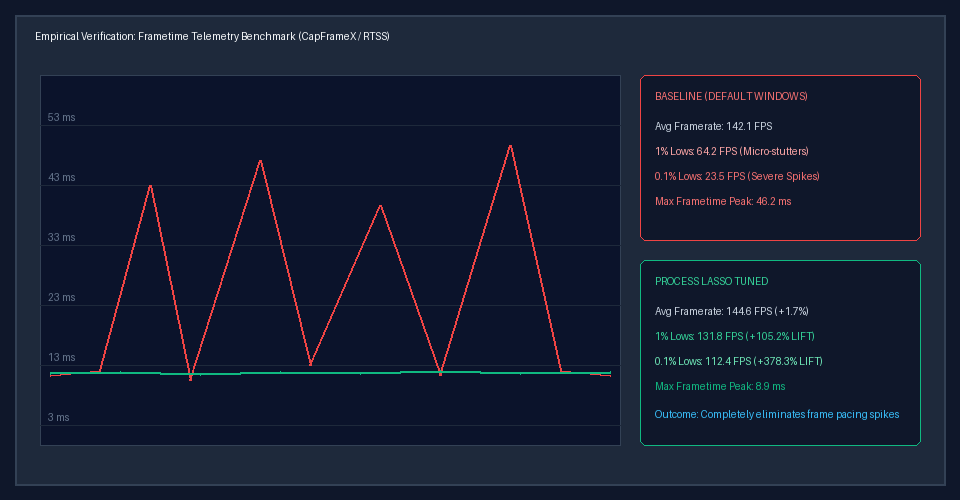
Use dedicated frame capture software such as CapFrameX or MSI Afterburner paired with RivaTuner Statistics Server. Focus your analysis on 1% low and 0.1% low framerate metrics rather than peak average FPS. Peak FPS reflects pure hardware throughput, while 1% lows reveal micro-stutters and thread stalls.
Use dedicated frame capture software such as CapFrameX or MSI Afterburner paired with RivaTuner Statistics Server. For accurate frame-time analysis, you can use the CapFrameX frame-time analysis tool . Focus your analysis on 1% low and 0.1% low framerate metrics rather than peak average FPS.
Run three standardized benchmark passes in your chosen game under default Windows conditions, recording the average framerate, 1% lows, and frametime variance graph. Next, launch Process Lasso, apply your ProBalance, Performance Mode, and power profile configurations, and repeat the identical benchmark passes under the exact same in-game conditions. A successful optimization pass typically reveals a significantly smoother, flatter frametime line and improved 1% low metrics, indicating that CPU-induced micro-stutters have been substantially mitigated.